Set up a wireless microphone system by matching its transmitter and receiver, choosing a clear radio frequency, connecting the receiver to your sound system, and testing the signal at performance level. This guide is for presenters, performers, and event helpers who know how to operate basic audio equipment. Allow 20-40 minutes, including a room test.

Get audio and creator gear delivered free — and shop member deals
- Fast, free delivery on millions of items
- Access to Prime Big Deal Days deals on October 6–7
- Prime Video, Amazon Music and more included

Phenyx Pro PTU-71-2H Dual UHF Auto Scan Handheld Wireless Microphone System
- ✔ System type: Dual-channel UHF handheld wireless system
- ✔ Selectable frequencies: 2 × 100 UHF frequencies
- ✔ Frequency ranges: Channel 1: 536.57–561.32 MHz; Channel 2: 562.37–587.12 MHz

Phenyx Pro PTU-52-2H Dual UHF Wireless Microphone System
- ✔ System type: Dual-channel UHF wireless
- ✔ Operating band: 500 MHz
- ✔ Tunable frequency groups: 30

JBL Wireless Two-Microphone System with Dual-Channel Receiver, Black
- ✔ Microphones: 2
- ✔ Receiver: Rechargeable dual-channel UHF
- ✔ Playback time: Up to 6 hours
Difficulty: Beginner | Time: 20-40 minutes
What You’ll Need
Tools & Materials:
- Wireless microphone transmitter and matching receiver
- Fresh batteries or charged transmitter battery
- Audio cable compatible with the receiver output and mixer or speaker input
- Mixer or powered speaker
- Headphones or monitor speakers for checking audio
- Microphone stand or bodypack clip, as appropriate
Knowledge:
- How to turn audio equipment on and off
- How to identify a mixer or speaker input and adjust its level
- Basic awareness of local wireless frequency rules
Check the manufacturer’s manual for compatible components, frequency setup, antenna placement, and connector type. Wireless frequencies and permitted transmit power vary by location. Use a legal frequency range for your area, and do not assume a frequency shown in an old setup is still available.
Phenyx Pro PTU-71-2H Dual UHF Auto Scan Handheld Wireless Microphone System
The PTU-71-2H earns the top spot because it gives buyers more tools for handling changing wireless conditions than the other two systems. Its auto frequency scan and 200 selectable UHF frequencies can help us find usable channels, while its dual-channel receiver supports two handheld microphones. The stated ability to accommodate up to 16 transmitters makes it the strongest fit here for larger coordinated setups, though we still need to plan frequencies carefully as more transmitters are added.Its metal receiver and microphone bodies, cardioid dynamic capsules, and included connection accessories suit live speaking and event work. The stated 290–328-foot line-of-sight range is the longest claim in this group, but it describes open conditions; walls and competing signals can shorten it. Compared with the PTU-52-2H, this system emphasizes frequency selection and multi-transmitter capacity rather than listing dedicated XLR outputs. Compared with the JBL, it offers much more frequency control, at the cost of a more involved setup and AA-powered microphones.
Pros:
- Auto scan and 200 selectable UHF frequencies support channel selection.
- Supports two microphones and states capacity for up to 16 simultaneous transmitters.
- Metal construction and cardioid dynamic microphones suit vocal use.
- Includes adapters and accessories, with battery life stated up to 16 hours.
Cons:
- The stated operating range depends on clear line of sight and may shrink in obstructed spaces.
- Handheld microphones use AA batteries rather than built-in rechargeable packs.
- Multi-transmitter operation calls for deliberate frequency coordination.
Best for: Event hosts, DJs, venues, and speakers who need two handheld mics now and room to coordinate additional transmitters.
Not ideal for: Buyers who want the simplest plug-and-play arrangement, built-in microphone recharging, or a system with clearly listed individual XLR outputs.
Bottom line: We recommend the PTU-71-2H for buyers who value frequency flexibility and expansion potential over the simplest setup.
“We recommend the PTU-71-2H for buyers who value frequency flexibility and expansion potential over the simplest setup.”
Phenyx Pro PTU-52-2H Dual UHF Wireless Microphone System
For a system that must connect neatly to a mixer or other audio gear, the PTU-52-2H has a practical advantage: two XLR outputs and one mixed 1/4-inch output. That gives us the option to route each microphone separately or combine them through the mixed output. The JBL description does not list comparable output choices, while the PTU-71-2H emphasizes frequency selection and simultaneous transmitters instead.The PTU-52-2H pairs two cardioid handheld microphones with a metal receiver and microphones, and its frequency hopping is designed to support quick pairing. It lists 30 tunable frequency groups and up to 200 feet of line-of-sight distance, a shorter stated reach than the PTU-71-2H. Its simultaneous operation guidance is also more limited: up to three units are stated to operate without interference. That makes this a sensible fit for small performance or presentation setups, but less suited to buyers anticipating a crowded multi-system stage. Included batteries, adapters, windscreens, and antennas help cover basic setup needs.
Pros:
- Two XLR outputs support separate microphone routing.
- A mixed 1/4-inch output offers a simple combined connection.
- Frequency hopping supports automatic pairing across 30 tunable groups.
- Includes batteries, cables, adapters, windscreens, and antennas.
Cons:
- The stated range is up to 200 feet in line-of-sight conditions.
- Up to three units are stated to operate simultaneously without interference.
- Uses AA batteries rather than built-in rechargeable microphones.
Best for: Small venues and presenters who want separate XLR feeds for two microphones or a single mixed 1/4-inch connection.
Not ideal for: Buyers planning many simultaneous wireless systems or prioritizing the longest stated range in this comparison.
Bottom line: We would choose the PTU-52-2H when its separate XLR outputs matter more than the PTU-71-2H’s broader frequency flexibility.
“We would choose the PTU-52-2H when its separate XLR outputs matter more than the PTU-71-2H’s broader frequency flexibility.”
JBL Wireless Two-Microphone System with Dual-Channel Receiver, Black
The JBL is the most approachable option for casual two-person audio: its plug-and-play setup and rechargeable dual-channel receiver keep the basic routine simple. If we already own a compatible speaker, we can connect the receiver and use both microphones without navigating the frequency-selection details provided for the Phenyx Pro systems. That simplicity is its main distinction, not a claim of greater range or more advanced interference management.The tradeoff is that the system depends on a compatible speaker, and the handheld microphones still rely on replaceable AA batteries. Its receiver offers up to six hours of playback, less than the PTU-71-2H’s stated microphone battery life, although these are different power measures and should not be treated as directly equivalent. Compared with the PTU-52-2H, JBL does not list separate XLR outputs or frequency-group details, so buyers with mixer-routing or venue coordination needs may prefer Phenyx Pro. For karaoke, informal hosting, and straightforward speech through a suitable speaker, fewer setup decisions may be exactly the point.
Pros:
- Two microphones work through a dual-channel receiver.
- Plug-and-play setup reduces initial configuration.
- Rechargeable receiver provides up to six hours of playback.
- Replaceable AA microphone batteries are easy to swap.
Cons:
- Requires a compatible speaker to produce sound.
- Microphones need separate AA batteries.
- The provided specifications do not list selectable frequencies or operating range.
Best for: Casual hosts and karaoke users who already have a compatible speaker and want an uncomplicated two-mic setup.
Not ideal for: Buyers who need a standalone speaker, detailed frequency coordination, separate XLR outputs, or long sessions without changing microphone batteries.
Bottom line: We recommend the JBL for simple two-microphone use with a compatible speaker, while buyers needing routing or frequency controls should look to Phenyx Pro.
“We recommend the JBL for simple two-microphone use with a compatible speaker, while buyers needing routing or frequency controls should look to Phenyx Pro.”
As an Amazon Associate we earn from qualifying purchases.
Before You Start
Place the receiver near the mixer or speaker, with a clear path to the microphone’s expected working area. Keep it away from metal obstructions, crowded equipment racks, Wi-Fi access points, and other radio transmitters when practical. If several wireless systems will operate together, coordinate their frequencies using the manufacturer’s scanning or coordination tools before powering all transmitters. Turn down the mixer or speaker input and main output before making connections to prevent a loud pop.
Step-by-Step Instructions
Step 1: Match the transmitter and receiver
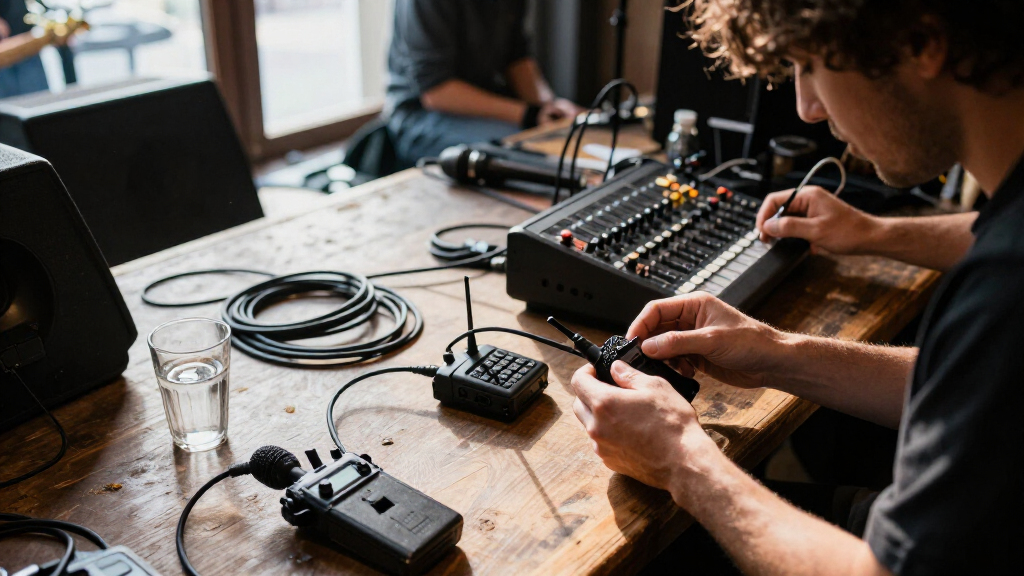
Check the model labels and frequency band on the microphone transmitter and receiver. Confirm they are designed to work together; units from different systems or incompatible bands may not connect even if their controls look similar. Read the manual for any pairing or synchronization procedure. Leave the transmitter muted or switched off while you prepare the receiver.
Tip: A handheld microphone contains its transmitter. A lavalier or headset system usually has a separate bodypack transmitter connected to the microphone.
Check: The transmitter and receiver are a compatible pair, and you know how to pair or sync them.
Step 2: Prepare the microphone and receiver
Fit fresh batteries or charge the transmitter, following its battery markings and the manufacturer’s instructions. Attach a lavalier or headset plug firmly to its bodypack, then secure the cable so normal movement will not pull the connector loose. Place the receiver on a stable surface with its front panel visible and antennas positioned as its manual recommends. For detachable antennas, attach them before powering up.
Tip: Do not mix old and new disposable batteries. Check the transmitter battery indicator before a long event.
Check: The microphone is assembled, the transmitter has usable power, and receiver antennas are fitted and unobstructed.
Step 3: Choose a clear frequency
Power on the receiver and use its scan function to find an available channel, if provided. If it has no scan function, select a frequency permitted in your location and check for competing signals according to the manual. For a system with a sync feature, point the transmitter’s sync window toward the receiver and run the sync procedure. For manual setup, set the same frequency or channel on both units.
Tip: When using multiple wireless microphones, use coordinated frequencies. Two systems set to different-looking channels can still interfere if their frequencies are incompatible.
Check: The receiver and transmitter show the same channel or frequency, and the receiver reports a usable signal without an interference warning.
Step 4: Connect the receiver to the sound system
With the mixer or speaker input level turned down, connect the receiver output to a suitable input using the correct cable. Use a balanced XLR connection when available for a longer cable run; use the receiver’s ¼-inch output with a matching line or instrument input as directed in its manual. Set the receiver output level to its recommended starting point. If connecting to a mixer, choose an appropriate microphone or line input based on the receiver output and mixer instructions.
Tip: Do not enable phantom power unless the equipment manuals specifically allow it. It is usually unnecessary for a wireless receiver output.
Check: The cable is seated at both ends, the receiver is connected to the intended mixer or speaker channel, and levels remain low.
Step 5: Power on and check the radio link
Switch on the transmitter, unmute it, and speak into the microphone at a normal distance. Watch the receiver’s RF or radio indicator. If it shows no signal, repeat pairing or frequency matching and move the transmitter closer to the receiver. Keep the transmitter away from the receiver antennas while checking; an extremely close signal can overload some systems.
Tip: RF indicates the radio connection; AF or audio indicators show sound reaching the receiver. A radio link alone does not confirm that the mixer is receiving audio.
Check: The receiver shows a stable radio signal while the microphone is on, and its audio indicator responds when you speak.
Step 6: Set audio levels
Raise the mixer or speaker channel level gradually while speaking at the loudness you expect to use. Adjust the receiver output and mixer preamp or input gain according to their manuals. Aim for a clear signal that does not clip; watch the mixer’s level meter and listen for distortion, hiss, or hum. Set the main output to a safe listening level before making further adjustments.
Tip: Hold a handheld microphone by its handle, not over the grille. Keep it a consistent distance from your mouth and avoid pointing it toward speakers.
Check: Speech is clearly audible through the intended speakers, with level meters out of the clipping range and no obvious distortion.
Step 7: Test the full working area
Walk the route the presenter or performer will use while speaking or singing at realistic volume. Check the receiver’s RF and audio indicators and listen from the audience or monitor position. Test likely movement points, including behind curtains, near walls, and at the edges of the stage. If the signal drops, reposition the receiver or antennas, rescan for a clear frequency, and repeat the walk test.
Tip: A quiet sound check from beside the receiver will not reveal dead spots across the room.
Check: The audio remains clear throughout the intended area, with no dropouts, unexpected noise, or clipping.
Step 8: Secure the final settings
Once the test passes, note or photograph the channel or frequency and level settings. Use the transmitter and receiver lock functions if available, then place the transmitter where it will be used. Keep spare batteries accessible and avoid changing frequencies after the check unless you repeat the full test.
Tip: Mute the transmitter before changing batteries, connecting or disconnecting its microphone, or handling it between speakers.
Check: The system retains its tested settings, the user can reach the mute control, and spare power is ready.
Common Mistakes to Avoid
- Setting the transmitter and receiver to different channels. — Use the sync procedure or compare both channel displays before the sound check.
- Turning up mixer gain to compensate for a weak or absent radio link. — Check RF and audio indicators first. Fix pairing, frequency, battery, or placement problems before raising audio gain.
- Blocking the receiver antennas or placing the receiver behind metal equipment. — Keep antennas clear and position the receiver where it has a usable path to the performer.
- Skipping a movement test or checking only at low speaking volume. — Test the full route at realistic performance volume before the audience arrives.
Troubleshooting
Problem: The receiver shows no RF signal.
Solution: Check that the transmitter is powered on, unmuted, paired, and set to the receiver’s channel. Replace or recharge its battery, then move closer and check antenna connections.
Problem: The signal cuts out when the performer moves.
Solution: Rescan for a clear frequency, move the receiver or antennas to a less obstructed position, and repeat the route test. Check that the transmitter antenna is not covered or damaged.
Problem: RF is present but there is no sound from the speakers.
Solution: Check the receiver’s audio indicator, transmitter mute, microphone connection, output cable, mixer channel assignment, and channel mute. Raise levels gradually after confirming each connection.
Problem: The sound is distorted, noisy, or feeds back.
Solution: Lower the affected input gain if meters clip. Check the microphone connector and battery, keep the microphone pointed away from speakers, and reduce nearby speaker level or reposition the microphone.
What Success Looks Like
The receiver shows a stable radio link, its audio indicator responds to speech, and the mixer or speaker produces clear sound at a useful level without clipping. The signal stays steady while the user moves through the intended area. The transmitter and receiver remain on their tested frequency, and spare batteries are available.
Next Steps
Before each use, inspect the cable and antennas, check battery status, confirm the selected frequency, and perform a brief sound check. After use, mute and switch off the transmitter, then power down the receiver and sound system as directed by their manuals. Remove disposable batteries if the equipment will be stored for an extended period. If problems persist across compatible equipment and clear frequencies, consult the manufacturer’s support or an audio technician.
Frequently Asked Questions
Can I use any wireless microphone with any receiver?
No. The transmitter and receiver must be compatible in system type and frequency band, and some models also require matching digital or analog formats. Check the manufacturer’s compatibility information before connecting them.
How far can a wireless microphone work?
Range depends on the system, antennas, radio interference, and obstructions. Use the manufacturer’s stated range as a guide, then test the actual room and route because walls, people, and equipment can shorten it.
Why does the receiver show RF but the mixer has no audio?
RF shows that the transmitter is reaching the receiver, not that audio is reaching the speakers. Check the microphone connection and mute state, receiver audio indicator, output cable, mixer input, channel mute, and gain.
Should I leave the wireless microphone on between speakers?
Mute it when it is not being used, especially while changing batteries or passing it between people. Turn the transmitter off when it will be unused for a longer period to save battery power and prevent accidental sound.
Fall Picks
fall essentials
As an affiliate, we earn on qualifying purchases.