Set up a studio microphone for streaming by choosing a compatible mic, placing it correctly, configuring your audio input, and checking your voice in a test recording. This guide is for new and returning streamers who want clear speech without clipping, room echo, or distracting noise. Allow 30-60 minutes, including time to adjust your setup and listen back.

Get audio and creator gear delivered free with Prime
- Fast, free delivery on millions of items
- Prime Video, Amazon Music and more included
- Member-only deals all year

Blue Yeti USB Microphone with Blue VO!CE effects, 4 pickup patterns – Blackout
- ✔ Connectivity: USB
- ✔ Pickup pattern: Multipattern; four selectable patterns
- ✔ Form factor: Tri-capsule array

MAONO PD200W Hybrid Wireless Podcast Microphone – Dynamic XLR/USB Mic with Desktop Stand
- ✔ Connectivity: Wireless, USB, XLR
- ✔ Capsule and pattern: 30 mm dynamic; unidirectional cardioid
- ✔ Signal-to-noise ratio: 82 dB

FIFINE T669 Studio Condenser USB Microphone for Recording Podcasting
- ✔ Connectivity: USB; USB Type-A and USB Type-C connector types listed
- ✔ Pickup pattern: Unidirectional cardioid
- ✔ Frequency range: 20 Hz–20 kHz
Difficulty: Beginner | Time: 30-60 minutes
What You’ll Need
Tools & Materials:
- Studio microphone suited to your connection: USB or XLR
- Computer with streaming or recording software
- USB cable for a USB mic, or XLR cable and audio interface for an XLR mic
- Stable microphone stand or boom arm
- Headphones for monitoring
- Pop filter or foam windscreen
Knowledge:
- Basic ability to connect a device and select an audio input in software
- For an XLR microphone, basic familiarity with an audio interface
Check the microphone’s connection and power requirements before buying or connecting it. USB microphones connect directly to a computer. XLR microphones need an audio interface or mixer with a microphone input; condenser models commonly need 48 V phantom power, while some dynamic models do not. Keep headphones available so you can monitor without sending speaker sound back into the microphone.
Blue Yeti USB Microphone with Blue VO!CE effects, 4 pickup patterns – Blackout
The Blue Yeti is our best overall choice for streamers who want to shape a desk-based USB setup around different recording situations. Its four pickup patterns give it an advantage over the cardioid-only FIFINE T669 and MAONO PD200W: a solo streamer can focus on one voice, while other patterns can support conversations or broader room capture. The onboard gain, mute, headphone volume, and pattern controls are useful when we need to make quick adjustments without navigating menus.Blue VO!CE effects add another layer of vocal control, but the full feature set depends on installing Logitech G HUB. That software requirement makes the Yeti less straightforward than the plug-and-play T669, and its larger desktop footprint can be awkward on a crowded streaming desk. Compared with the MAONO, it also stays in a USB workflow, so it is not the pick for someone who wants wireless or XLR expansion. Choose it for pattern flexibility and accessible physical controls; skip it if compactness or a software-free setup matters more.
Pros:
- Four selectable pickup patterns cover more recording arrangements than the cardioid-only alternatives.
- Onboard mute, gain, headphone volume, and pattern controls support quick live adjustments.
- Blue VO!CE software provides additional vocal effects and processing options.
- USB connection keeps the basic setup direct for a compatible computer.
Cons:
- The full Blue VO!CE feature set requires Logitech G HUB.
- Its large desktop footprint can crowd a compact streaming desk.
- USB-only connectivity offers less expansion than the MAONO PD200W.
Best for: PC streamers who want one USB microphone for solo broadcasts, voice chat, and occasional multi-person recording.
Not ideal for: Streamers with very limited desk space or those who want wireless or XLR connectivity.
Bottom line: Choose the Blue Yeti when flexible pickup patterns and hands-on streaming controls matter more than desk space or connection variety.
“Choose the Blue Yeti when flexible pickup patterns and hands-on streaming controls matter more than desk space or connection variety.”
MAONO PD200W Hybrid Wireless Podcast Microphone – Dynamic XLR/USB Mic with Desktop Stand
The MAONO PD200W is the most adaptable connection choice here. It can work wirelessly, over USB, or through XLR, so a streamer can begin with a computer and later consider a mixer or audio interface. Its dynamic cardioid capsule also distinguishes it from the condenser designs in the Yeti and T669. That voice-focused format makes this a compelling option for a streaming station where the microphone is intended primarily for the speaker rather than multiple people around a table.The tradeoff is a more involved kit and workflow. The supplied desktop stand may not suit every desk, and the listed 1.32 kg weight is worth considering when planning placement. MAONO Link app controls for EQ and reverb provide tuning options, while wireless operation is specified for up to 60 hours and a 60 m range. But video creators may need separate camera or Lightning accessories for synchronization. Compared with the Yeti, the PD200W gives up four-pattern flexibility and onboard pattern selection; compared with the T669, it offers more connection paths but less of an included boom-arm setup. It fits streamers who expect their rig to evolve.
Pros:
- Wireless, USB, and XLR connectivity support several streaming and recording configurations.
- Dynamic cardioid capsule differentiates it from the condenser microphones in this lineup.
- MAONO Link app includes EQ and reverb controls.
- Listed battery life of up to 60 hours and wireless range of up to 60 m support untethered use.
Cons:
- Camera or Lightning synchronization accessories may need to be purchased separately.
- The included desktop stand may not fit every streaming desk or preferred microphone position.
- It does not offer the Yeti’s four selectable pickup patterns.
Best for: Streamers who want the option to use a microphone wirelessly now or connect through USB or XLR as their setup changes.
Not ideal for: Buyers who need a simple included boom-arm arrangement or complete camera synchronization accessories in the box.
Bottom line: Pick the PD200W if connection flexibility and wireless operation are priorities, and you are comfortable planning around its accessory and stand requirements.
“Pick the PD200W if connection flexibility and wireless operation are priorities, and you are comfortable planning around its accessory and stand requirements.”
FIFINE T669 Studio Condenser USB Microphone for Recording Podcasting
The FIFINE T669 makes it easy to build a more complete streaming position from the start. Its plug-and-play USB connection is paired with a steel boom arm, shock mount, and double pop filter, so the bundle addresses placement and plosive control as well as voice capture. For a first PC setup, that included hardware can matter more than extra pattern choices: the arm lets us position the mic toward the speaker while keeping it off the center of the desk.Its cardioid condenser capsule is a simpler proposition than the Blue Yeti’s four-pattern array. That makes the T669 a reasonable fit for one person speaking into the mic, but less suited to switching among solo, interview, and room-capture arrangements. The T669 also has a gain knob and an 8.2 ft detachable cable, though it is primarily aimed at PCs and compatible consoles; it is not Xbox compatible and has limited mobile support. Compared with the MAONO, it does not offer wireless or XLR options. Choose it for the included mounting kit and straightforward USB setup, and look elsewhere if your platform or future connection needs are uncertain.
Pros:
- Plug-and-play USB setup is designed for PCs and laptops.
- Steel boom arm, shock mount, and double pop filter are included.
- Cardioid pickup focuses on a single speaker.
- Gain knob and detachable 8.2 ft USB cable add practical setup control.
Cons:
- Not compatible with Xbox consoles.
- Limited mobile device support narrows its use outside a PC or compatible console desk.
- Single cardioid pattern is less flexible than the Blue Yeti’s four options.
Best for: A first-time PC or compatible console streamer who wants a boom arm and basic recording accessories included.
Not ideal for: Xbox users, mobile-first creators, and streamers who want wireless, XLR, or multiple pickup patterns.
Bottom line: The T669 is a practical starter bundle when a PC streamer needs an included boom arm and a simple cardioid USB workflow.
“The T669 is a practical starter bundle when a PC streamer needs an included boom arm and a simple cardioid USB workflow.”
As an Amazon Associate we earn from qualifying purchases.
Before You Start
Choose the quietest practical room and turn off nearby fans or devices that create steady noise. Place the microphone away from keyboard taps and desk vibrations. If using an XLR condenser mic, connect the cable with phantom power off, then enable 48 V only if the mic requires it. Lower the interface gain before speaking to prevent a sudden loud signal.
Step-by-Step Instructions
Step 1: Choose a microphone that fits your setup
Decide between USB and XLR based on your equipment and how much control you need. Pick USB if you want a direct computer connection with fewer components. Pick XLR if you already have an audio interface or want to use one; include the interface, cable, and any required stand in your budget. Check the microphone’s pickup pattern and choose a cardioid model if you mainly want to capture the person speaking in front of it.
Tip:A studio label alone does not guarantee better stream audio. Room noise, placement, and input levels affect the result as much as the microphone.
Check: You have a mic whose connection is supported by your computer or interface, plus the cable and mounting hardware it needs.
Step 2: Mount the microphone near your speaking position
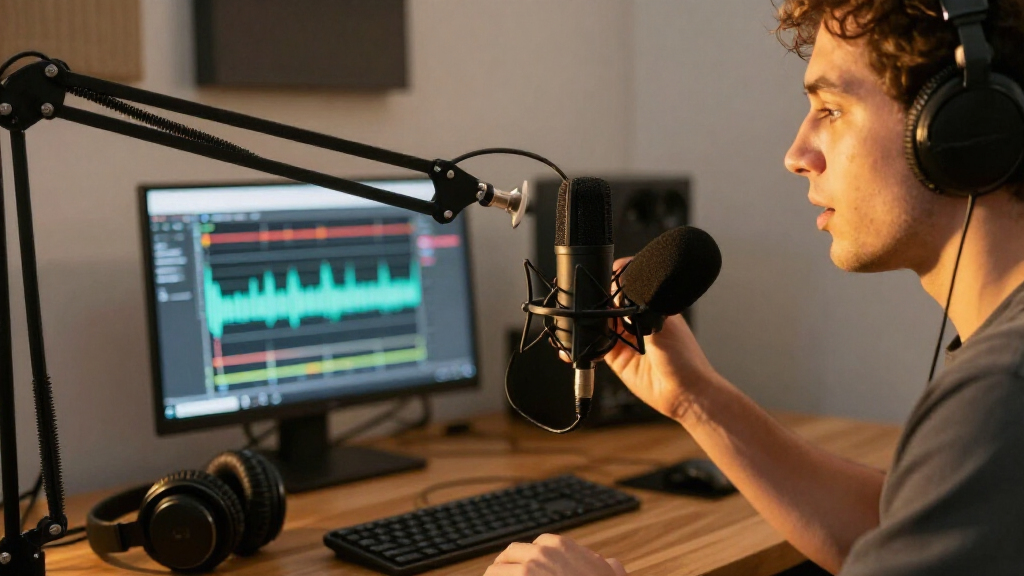
Attach the mic securely to a stand or boom arm. Position it about 10-15 cm (4-6 inches) from your mouth, slightly to one side, and aim it toward your speaking area. Keep the capsule near mouth height. Add a pop filter between your mouth and the mic to soften bursts of air from sounds such as “p” and “b.”
Tip:Use a shock mount or a stable arm if desk bumps travel into the microphone. Leave room to move without hitting the mic or filter.
Check: The microphone stays in place, points toward your mouth, and does not block your face or create a cramped speaking position.
Step 3: Connect the microphone and set its input
For USB, connect the mic directly to the computer or to a powered hub, then wait for the operating system to recognize it. For XLR, connect the mic to the interface’s microphone input and connect the interface to the computer. If the mic requires phantom power, enable 48 V after making the connections. Open your system’s sound settings and select the microphone or interface as the input device.
Tip:If you use an interface, connect headphones to it when possible. This lets you hear the input directly and can avoid monitoring delay.
Check: The input device appears in sound settings, and speaking produces visible input activity in the system meter or interface.
Step 4: Set the input level
Open your recording or streaming software and select the same microphone or interface as its input. Speak at your normal streaming volume and adjust the mic gain or input level until your voice registers clearly without reaching the clipping zone. If a meter shows decibels, aim for ordinary speech peaks around -12 to -6 dBFS. Lower the gain if loud words turn the meter red or sound harsh.
Tip:Change microphone gain at the interface or in the operating system, then recheck the software meter. Avoid turning up several separate controls at once, since that makes it harder to find the cause of distortion.
Check: Your normal speech is easy to see on the meter, and louder phrases stay below clipping.
Step 5: Configure monitoring and software processing
Put on headphones and monitor the microphone if your software or interface supports it. Listen for hum, hiss, room echo, and plosive pops. Start with processing disabled; then add only what you need, such as a light noise gate for pauses or gentle compression to even out volume. Keep effects subtle so they do not cut off word endings or make your voice sound unnatural.
Tip:A noise gate cannot remove noise while you speak. If background noise is obvious, reduce it at the source or reposition the microphone before adding stronger processing.
Check: You can hear your voice clearly in headphones, with no distracting echo, excessive noise reduction, or delayed duplicate sound.
Step 6: Record a test and check the stream input
Record 30-60 seconds of the way you expect to speak while streaming. Include quiet speech, normal speech, and one louder phrase. Listen back on headphones, then check the streaming software’s audio meter or private test mode if available. Adjust mic distance, angle, gain, or processing one at a time and make another short recording after each change.
Tip:Speak at your usual volume and sit as you will during a stream. A test made from much closer or farther away may not match your live sound.
Check: The recording has clear, steady speech, no clipped peaks or harsh pops, and little distracting room noise. The streaming software also shows activity from the intended mic.
Common Mistakes to Avoid
- Placing the microphone too far away and compensating with high gain. — Keep it roughly 10-15 cm (4-6 inches) from your mouth and adjust its angle before raising gain.
- Selecting the webcam, laptop mic, or another input in streaming software. — Choose the intended microphone or interface in both system sound settings and the streaming app, then check its meter.
- Turning gain up until speech clips or distorts. — Speak at normal volume while adjusting, watch the meter, and leave headroom for louder phrases.
- Using aggressive noise reduction to hide a noisy room. — Reduce noise at its source and move the mic closer before increasing software processing.
Troubleshooting
Problem: The computer or streaming app does not show the microphone.
Solution: Reconnect the cable, try another USB port or known-good cable, and check system input settings. For an interface, confirm it is powered and selected as the system input. Restart the app after connecting the device.
Problem: The microphone is detected but the meter does not move.
Solution: Check the selected input, mute switch, interface gain, and operating system microphone permissions. For an XLR condenser mic, confirm it has the power specified by its manufacturer.
Problem: Your voice sounds distorted or the meter clips.
Solution: Lower the mic or interface gain, then make another test recording at normal speaking volume. Check that software input gain is not adding extra level.
Problem: The recording sounds echoey or picks up room noise.
Solution: Move closer to the mic, aim its front toward your mouth, and turn its rear toward the main noise source if it has a cardioid pattern. Reduce noise nearby and add soft furnishings if practical.
What Success Looks Like
Your microphone is selected in the operating system and streaming app, its meter responds to your voice, and a test recording sounds clear and natural. Normal speech stays below clipping, louder phrases remain clean, and background noise or room echo does not distract from the words.
Next Steps
Save your working input and processing settings before your first stream. At the start of each session, confirm the correct input, check the meter, and record a brief test if you changed equipment or room position. If the sound changes, check mic distance, cable connections, and gain before adding more effects.
Frequently Asked Questions
Should I use a USB or XLR microphone for streaming?
USB is a practical choice if you want to connect directly to a computer. XLR is useful when you have or want an audio interface, which provides physical input controls and connections for compatible equipment. Either can produce clear streaming audio with good placement and levels.
How close should a studio microphone be to my mouth?
Start about 10-15 cm (4-6 inches) away, with the mic slightly off to one side. Adjust the distance for your voice and microphone, then set gain while speaking at your normal streaming volume.
Do I need phantom power?
Some condenser microphones need 48 V phantom power; many dynamic microphones do not. Check the microphone’s instructions and enable phantom power only when the mic requires it. Turn it off before changing connections.
Why does my voice sound different in headphones from the recording?
Direct monitoring through an interface can sound different from the processed signal in your streaming app. Listen to a saved test recording to check the final sound, and confirm the app is using the same input and processing you expect during a stream.