
This guide walks you through the complete process of getting a wireless microphone system working for content creation — from unboxing and charging through pairing, mounting, setting levels, and recording a test clip you can verify. It is written for beginner and intermediate creators: YouTubers, vloggers, online course makers, podcasters who record video, and anyone filming with a phone, mirrorless camera, or computer. By the end, you will have a working wireless audio chain and a recorded test file that sounds clean, stays in sync, and holds its connection across a room. Expect the first setup to take 45 to 90 minutes, most of which is charging, level setting, and testing — not the pairing itself.

Get audio and creator gear delivered free — and shop member deals
- Fast, free delivery on millions of items
- Access to Prime Big Deal Days deals on October 6–7
- Prime Video, Amazon Music and more included

DJI Mic Mini Wireless Microphone (2 Transmitters + 1 Mobile Receiver)
- ✔ Configuration: 2 transmitters + 1 mobile receiver
- ✔ Transmitter Weight: 10 g
- ✔ Max Transmission Range: 300 m
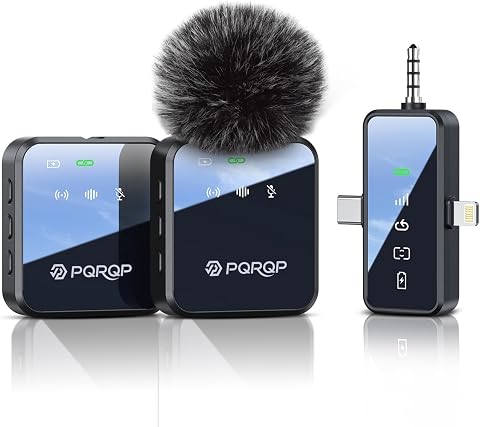
PQRQP 3-in-1 Wireless Mini Microphone for iPhone, Android, Camera
- ✔ Product Type: Wireless mini clip-on microphone
- ✔ Compatibility: iPhone, Android, iPad, laptop, camera
- ✔ Wireless Range: 328 ft (2.4G)

Mini Mic Pro Wireless Lavalier Microphone for iPhone and Android
- ✔ Product Type: Wireless lavalier microphone
- ✔ Compatibility: iPhone, Android, tablets, laptops
- ✔ Connectivity: Wireless with USB-C and Lightning adapters
Difficulty: Beginner | Time: 45-90 minutes (including a test recording session)
What You’ll Need
Tools & Materials:
- A wireless microphone system (clip-on lavalier transmitter, receiver, and charging case, or a plug-in receiver unit)
- A recording device: smartphone, mirrorless/DSLR camera, computer, or audio recorder
- The correct cable or adapter to connect the receiver to your recording device (3.5mm TRS/TRRS, USB-C, Lightning, or full-size XLR — check your system’s included cables)
- A windscreen or foam cover for outdoor recording
- A clip, magnetic pendant, or lanyard for mounting the transmitter on your subject
- Fresh batteries or a USB charger (most systems charge via USB-C)
Knowledge:
- Basic operation of your recording device (starting/stopping video, adjusting input volume if available)
- How to transfer or open recorded files on your computer or phone for playback
Before you begin, confirm compatibility between your mic system and your recording device. The most common failure point is a 3.5mm mismatch: cameras and phones use different plug wiring (TRS versus TRS with different ring configurations), and many recent phones have no headphone jack at all. If you use an iPhone without a jack, you need a receiver that connects via Lightning or USB-C, or a dedicated adapter. Check the manufacturer’s compatibility list before buying or opening the box, and keep the receipt until you have completed a successful test recording.
DJI Mic Mini Wireless Microphone (2 Transmitters + 1 Mobile Receiver)
The DJI Mic Mini earns our top spot because it solves the problem most single-mic kits ignore: what happens when your content needs two voices? With two 10 g transmitters and one USB-C mobile receiver, this kit handles interviews, podcasts and dual-host videos straight out of the box — something neither the Mini Mic Pro nor the PQRQP base configuration can match as elegantly. The ultralight transmitters are a genuine comfort advantage; compared with chunkier clip-ons, you can wear one on a shirt collar for hours without it sagging the fabric or appearing prominently in frame.The 11.5-hour operating time is the standout spec, nearly double what the Mini Mic Pro offers per charge and enough for a full shoot day without babysitting a battery. The 300 m transmission range is far beyond what most creators will ever use, but it translates into rock-solid stability at normal recording distances, even through walls at indoor events. Adjustable noise cancellation with two levels gives you control the simpler kits don’t — use Basic for natural ambience in cinematic work, Strong for noisy streets and conventions. Automatic audio limiting prevents clipping when a speaker suddenly raises their voice, a safeguard the PQRQP lacks.There are real tradeoffs. This configuration omits the charging case, so you’ll need to keep a USB-C cable handy for multi-day use — a genuine annoyance at this positioning. The kit also isn’t waterproof, and the transmitters contain magnets, which demands caution around pacemakers and credit cards. Still, for creators who see audio as infrastructure rather than an afterthought, this is the most complete system here.
Pros:
- Two transmitters enable interviews and dual-speaker content with no extra purchases
- 11.5 hours of operating time outlasts full shoot days
- 10 g transmitters are discreet and comfortable for extended wear
- Adjustable noise cancellation plus automatic limiting protect audio quality
Cons:
- No charging case included in this configuration
- Not waterproof for rainy or high-humidity outdoor shoots
- Magnets require caution around pacemakers and magnetic-sensitive items
Best for: Interviewers, podcasters and two-person content teams who need professional reliability and all-day battery
Not ideal for: Solo creators on a strict budget who only ever record one voice, or anyone who wants a charging case included
Bottom line: The most capable and future-proof kit in this lineup, worth it for anyone whose content involves more than one voice or long recording sessions.
“The most capable and future-proof kit in this lineup, worth it for anyone whose content involves more than one voice or long recording sessions.”
PQRQP 3-in-1 Wireless Mini Microphone for iPhone, Android, Camera
The PQRQP 3-in-1 stakes its claim on versatility per dollar. Its defining feature is broad device coverage: unlike the DJI Mic Mini’s mobile-focused USB-C receiver, this kit’s plug-and-play receiver works with phones, tablets, laptops and cameras, making it the strongest choice for hybrid creators who shoot phone vlogs one day and mirrorless B-roll the next. Audio quality holds up well too, with 48kHz/24-bit recording that gives editing headroom the Mini Mic Pro’s more basic capture doesn’t offer.Battery life is the headline spec: up to 20 hours total when running both microphones (10 hours each), which puts it ahead of even the DJI for raw combined runtime — though note the caveat that a single mic yields 10 hours, not 20. The 328 ft range on 2.4G wireless is shorter than DJI’s 300 m figure but more than enough for typical creator scenarios like walk-and-talk vlogs or seated interviews. Creative touches like reverb effects, one-touch mute and noise cancellation give streamers and solo creators in-app-style flexibility without opening editing software.The compromises are structural. Because it relies on an included receiver dongle rather than direct device connection, you’ll occupy a port and manage a small accessory — less elegant than solutions that pair natively. The windproof cotton cover also needs careful positioning; get it wrong and it muffles your voice. Compared with the DJI Mic Mini, you’re trading transmitter refinement, audio limiting and brand polish for a lower cost of entry and camera support. For many creators, that’s a trade worth making.
Pros:
- Works with cameras alongside phones, tablets and laptops
- Up to 20 hours of combined battery life with dual microphones
- 48kHz/24-bit audio with reverb, mute and noise cancellation features
- Stable 2.4G connection with 328 ft range
Cons:
- Requires the included receiver dongle rather than direct connection
- Realistic single-mic runtime is 10 hours, not the headline 20
- Windproof cover needs careful positioning to avoid muffled audio
Best for: Budget-conscious solo creators and vloggers who switch between phones, laptops and cameras
Not ideal for: Creators who need polished two-person interview workflows or premium build refinement
Bottom line: The smartest pick for creators who want camera compatibility and long battery without paying premium-system prices.
“The smartest pick for creators who want camera compatibility and long battery without paying premium-system prices.”
Mini Mic Pro Wireless Lavalier Microphone for iPhone and Android
The Mini Mic Pro is the pick for creators who want to stop deliberating and start recording. Its philosophy is radical simplicity: plug-and-play with no apps and no Bluetooth pairing, using included USB-C and Lightning adapters that cover essentially every modern phone. Where the PQRQP asks you to manage a receiver and the DJI has companion-app options, this kit just works the moment you plug in — the shortest path from idea to uploaded video of anything here. At under an ounce, it’s also the lightest and most pocketable option, ideal for travel creators who forget gear exists until they need it.Where it shows its budget positioning is endurance and range. The 6-hour battery life is respectable but roughly half the PQRQP’s per-mic runtime and well short of the DJI’s 11.5 hours, so all-day event coverage isn’t realistic without a top-up. A thoughtful mitigation: the mic supports charging your device while recording, meaning a power bank can keep both phone and mic alive during long sessions — a genuinely practical touch the other kits don’t emphasize. Wind protection is generous for the class, with both a foam windscreen and a dead cat cover for gusty outdoor conditions.The noise cancellation is serviceable rather than sophisticated, and in very loud environments it struggles where the DJI’s Strong mode holds firmer. Being a single microphone, it also can’t do interviews without a second unit. But for a solo talking-head creator uploading from a phone, those limitations rarely matter — and the simplicity is the point.
Pros:
- Genuinely instant plug-and-play setup across iPhone, Android, tablets and laptops
- Includes both foam windscreen and dead cat cover for outdoor use
- Featherweight under-1-oz design is effortlessly portable
- Can charge your device while recording
Cons:
- 6-hour battery is the shortest of the three picks
- Noise cancellation falters in very loud environments
- Tiny clip-on unit is easy to misplace between shoots
Best for: Beginners and solo phone-based creators who prioritize zero-setup recording over advanced features
Not ideal for: Interview shooters, all-day event coverage, or creators working in consistently loud environments
Bottom line: The easiest entry point into wireless audio — choose it for frictionless solo recording, not demanding production work.
“The easiest entry point into wireless audio — choose it for frictionless solo recording, not demanding production work.”
As an Amazon Associate we earn from qualifying purchases.
Before You Start
Charge everything first. Most wireless systems ship with partially drained batteries, and a low transmitter battery mid-recording is the most common cause of dropped or degraded audio. Charge the transmitter and receiver to full — usually 60 to 90 minutes — before doing anything else. While they charge, read the quick-start card that came with the system and note which button does pairing, because this varies by brand and the pairing sequence is order-sensitive on many models. Also decide where you will do the test recording: pick a quiet room, close windows, and turn off fans, air conditioning, and refrigerators within earshot. Background hum that seems quiet in the room is much more noticeable in a recording.
Step-by-Step Instructions
Step 1: Charge the transmitter and receiver to full
Place both units in the charging case or connect them via USB-C, and wait until their indicator lights show a full charge — typically a solid green light or a battery icon on the case display. Do not begin pairing or recording until both units are fully charged.
Tip: If the lights are unfamiliar, check the quick-start guide for what ‘charged’ looks like on your specific model. Guessing here leads to mid-session power loss.
Check: Both units show a full-charge indicator and have been unplugged or removed from the case.
Step 2: Power on both units and pair them
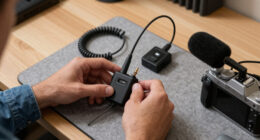
Turn on the transmitter (the unit that clips to your shirt) first, then the receiver. Most systems pair automatically within a few seconds of powering on; if they do not, press and hold the pairing button on the receiver, then the pairing button on the transmitter, in that order. Keep the units within one meter of each other during pairing.
Tip: Watch the lights: paired units usually show matching solid lights or a linked icon. Flashing lights on either unit mean the link has not formed yet.
Check: Both units show a connected/steady indicator light rather than blinking or showing a search signal.
Step 3: Connect the receiver to your recording device
Plug the receiver into your phone, camera, or computer using the correct port or cable. On a phone, this may be USB-C or Lightning directly; on a camera, it is usually a 3.5mm mic input cable; on a computer, plug into the mic input or use a USB interface. Push connectors in fully — a half-seated 3.5mm plug produces quiet or distorted audio.
Tip: If your camera has a ‘mic input’ versus ‘headphone output’ confusion, the mic input is almost always marked with a microphone symbol or a red ring. Plugging into the headphone jack is a frequent error.
Check: The recording device registers an external microphone — on phones and computers, check the input meter or settings menu; on cameras, the external mic icon appears on screen.
Step 4: Mount the transmitter correctly on your body
Clip the transmitter to your shirt or collar roughly 15 to 20 centimeters below your mouth — about chest height, centered. If using a magnetic pendant, place it inside your shirt with the magnet outside. Attach the lavalier mic (if your transmitter has an external lapel mic) with the capsule about a hand-width below your chin, not rubbing against fabric.
Tip: Keep the transmitter away from jewelry, zippers, and loose scarves. Anything that brushes the unit or cable becomes a rustling noise in the recording.
Check: The mic sits at chest height, is secure when you move your head and arms, and no cable is taut or dangling.
Step 5: Set the recording level
Start a test recording on your device and speak at the volume you will actually use while filming — louder than conversation, similar to presenting. Watch the input level meter if your device shows one. Aim for peaks around -12 dB, well below the red zone at 0 dB. Adjust the gain on the transmitter or receiver if your system has a gain control; otherwise adjust input level in the recording device or camera’s audio menu.
Tip: Speak a sentence that includes loud syllables (‘Peter Piper picked…’) while watching the meter. If the meter clips into red, lower the gain one step and repeat.
Check: Your voice registers clearly on the meter with peaks around -12 dB and never touches the red clip zone.
Step 6: Record a full test clip with movement
Record at least 60 seconds while you move the way you will in real content: walk across the room, turn your head, gesture, and put your hands near the transmitter. Speak continuously. Then stop recording and play the clip back on headphones, not just speakers.
Tip: Headphone playback reveals hum, rustle, and dropouts that laptop speakers hide. Always verify on headphones.
Check: Playback is loud and clear, stays in sync with video, and has no dropouts, crackles, or fabric noise.
Step 7: Test the realistic range and obstacles
Record another test with the receiver where it will actually sit during filming — for example, on a tripod-mounted camera across the room, or in your pocket while your phone films handheld. Walk the maximum distance you expect to use, including behind a wall or doorway if your setup requires it. Play back and check for dropouts.
Tip: Your body blocks radio signal. If audio drops when you turn your back to the receiver, reposition the receiver higher or closer before the real shoot.
Check: Audio remains continuous at your full working distance, including with your body between transmitter and receiver.
Step 8: Add wind protection and finalize your setup
Attach the foam windscreen or furry cover over the microphone capsule if you will record outdoors or near fans. Do one final short test to confirm the windscreen did not muffle the audio, then note your final settings — gain level, mounting position, and receiver placement — so you can reproduce this exact configuration on every future shoot.
Tip: Take a photo of your levels screen and mounting setup. This saves ten minutes of guesswork next time.
Check: A final test clip with the windscreen on sounds identical indoors and usable outdoors, and you have recorded your settings.
Common Mistakes to Avoid
- Recording with a half-charged transmitter battery, causing the signal to weaken or drop mid-session. — Always charge both units to full before every shoot. Check battery indicators as part of your pre-recording routine, not just the first time.
- Plugging the receiver into a headphone output instead of the mic input, resulting in silence or extremely quiet audio. — Verify the port is labeled with a microphone symbol before plugging in, and confirm the input meter moves when you speak.
- Setting gain too high, producing distorted, clipped audio that cannot be fixed in editing. — Always run a loud-syllable test and confirm peaks stay around -12 dB. Quiet-but-clean audio can be raised in editing; distorted audio cannot be repaired.
- Mounting the mic where it rubs against clothing, filling the recording with rustling noise. — Position the capsule away from collars, scarves, and straps, and test with head turns and gestures before committing to the take.
Troubleshooting
Problem: Transmitter and receiver will not pair.
Solution: Power both units off, then power the transmitter on first and the receiver second, keeping them within one meter. If they still will not link, follow the manual’s explicit pairing sequence — many models require holding the receiver’s button first. As a last resort, perform a factory reset per the manual and re-pair.
Problem: Audio is recorded but extremely quiet.
Solution: Check three things in order: the connector is fully seated in the mic input; the gain on the transmitter or receiver is raised; and the recording device’s input level is turned up. If using a camera, confirm the camera’s input is set to ‘external mic’ rather than ‘internal mic’, and check whether the camera expects a different plug type (TRS versus TRRS) — a mismatched adapter causes exactly this symptom.
Problem: Audio drops out or crackles at distance.
Solution: Move the receiver higher and closer, and keep it in line of sight with the transmitter. Your body absorbs the signal, so reposition the receiver so your torso is not between the two units. Interference from Wi-Fi routers and other 2.4 GHz devices can also cause dropouts; move away from routers or switch channels if your system allows it.
Problem: Audio and video are out of sync.
Solution: First check whether the delay exists in the raw file or only after editing — editing software sometimes introduces lag during preview. If the raw file is delayed, use your editor’s audio offset function to nudge the audio track earlier by 50 to 150 milliseconds until lip movement matches. Some phones also process Bluetooth-style audio with latency; using the wired receiver connection instead eliminates this.
What Success Looks Like
Your setup is complete when all of the following are true: the transmitter and receiver power on and pair automatically without manual intervention; a 60-second test recording played through headphones contains clear, loud speech with peaks around -12 dB and no clipping; the audio stays continuous while you walk your full working distance, including with your body between the units; the audio track is in sync with your video; and you have noted or photographed your final gain setting, mounting position, and receiver placement. If any of these fail, resolve them using the troubleshooting section before recording real content — fixing audio problems after a shoot is rarely possible.
Next Steps
Build your verified settings into a repeatable pre-shoot checklist: charge both units, confirm pairing lights, check mounting height, verify input meter levels with a spoken test, and record a 10-second scratch clip before every session. For your next upgrade, consider a second transmitter if you interview people — most modern systems support two mics to one receiver. If you record outdoors regularly, invest in a proper furry windscreen rather than the included foam. And if you eventually need more range or more reliable signal in complex environments like convention halls, research UHF systems or plug-in transmitter systems, which handle interference and distance better than compact 2.4 GHz kits.
Frequently Asked Questions
Do I need an expensive wireless mic system, or is a budget one good enough?
For indoor talking-head content, phone calls to camera, and short-range work under 15 meters, budget systems in the $50 to $150 range deliver clean audio. Spend more when you need longer range, dual transmitters for interviews, better wind handling, or onboard recording in the transmitter as a safety backup.
Will a wireless mic work with my phone if it has no headphone jack?
Yes, if the receiver connects via USB-C or Lightning directly, or through a genuine adapter cable from the mic manufacturer. Avoid generic 3.5mm-to-USB-C adapters, as many do not carry microphone input. Check the mic maker’s compatibility page for your exact phone model before purchasing.
How far away can I get from the receiver before the signal drops?
Compact 2.4 GHz systems typically quote 50 to 200 meters line of sight, but real-world range indoors is much shorter — walls and your own body reduce it substantially. Treat 10 to 20 meters indoors with obstacles as the practical limit, and always run a movement test in your actual filming space before recording.
Should I record a backup track in case the wireless signal fails?
Yes, whenever the take matters. Many transmitters record audio to internal storage, or you can record a backup with your phone’s built-in mic or a second recorder in your pocket. Syncing the backup later takes minutes; re-recording a lost interview may be impossible.
Why does my audio sound fine on the meter but muffled in the final video?
Check whether the windscreen or clothing is covering the mic capsule, and confirm the capsule faces your mouth rather than pointing sideways. Also verify you are playing back through decent headphones or speakers — phone speakers naturally make voice audio sound thin or muffled regardless of the recording quality.
Fall Picks
fall essentials
As an affiliate, we earn on qualifying purchases.