
In the first 10 minutes of gear refurbishment, verify the lubricant type and check for signs of contamination like sludge or dryness. Inspect the gear material for fatigue, cracks, or corrosion, ensuring dimensions match original specs. Examine gear teeth for uneven wear, chips, or cracks, and listen for unusual noises or resistance when manually turning the gear. Also, tighten or replace loose or damaged fasteners. For detailed steps, continue exploring the essential checklist to keep your gear in prime condition.
Key Takeaways
- Verify lubricant type, application quantity, and check for signs of contamination or inadequate lubrication.
- Inspect gear material for fatigue, corrosion, cracks, deformation, and verify dimensions against standards.
- Examine gear teeth for damage, uneven wear, cracks, and listen for unusual noises during manual rotation.
- Check mounting points and fasteners for looseness, corrosion, or damage; tighten or replace as needed.
- Confirm all sensors or smart features are functioning properly to ensure ongoing gear condition monitoring.
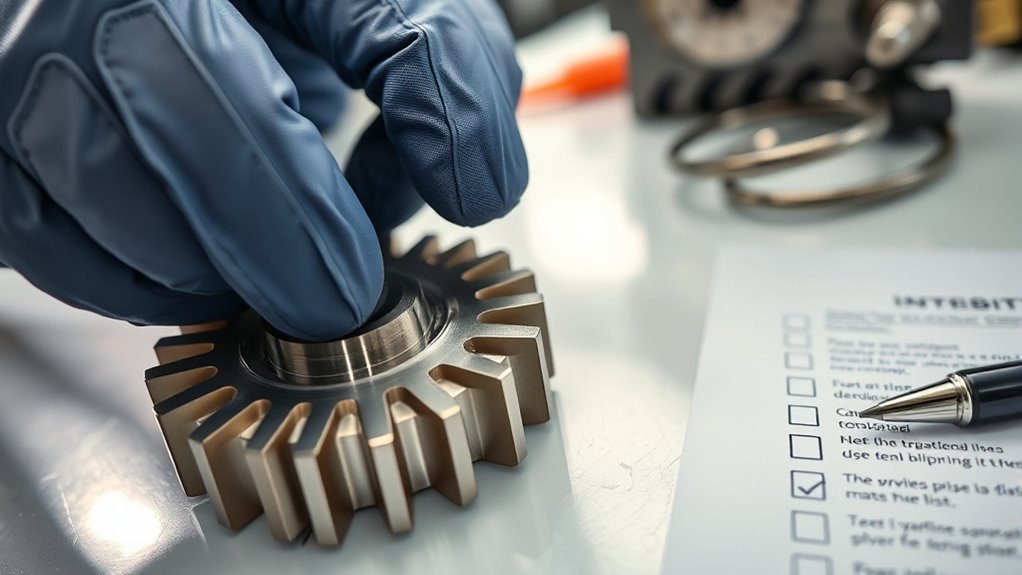
Are you confident your refurbished gear meets all safety and performance standards? When you’re inspecting gear early in the process, one of the first things to verify is whether it adheres to the lubrication requirements. Proper lubrication is essential for optimal operation and longevity. Check if the gear has been correctly lubricated according to manufacturer specifications, ensuring that the right type of lubricant is used and that it’s applied in the correct quantities. Inadequate lubrication can lead to increased wear, overheating, and potential failure. If the gear shows signs of insufficient or contaminated lubricant—such as dryness, discoloration, or sludge—you need to address this immediately. Additionally, consider whether the gear’s smart features or sensors are functioning correctly, as these can impact maintenance and monitoring. Next, focus on the gear material specifications. Confirm that the gear is made from the correct material as specified in the original documentation or refurbishment standards. This is critical because using the wrong material can compromise the gear’s strength, durability, and compatibility with other components. Look for any visible signs of material fatigue, corrosion, or deformation, which might indicate that the gear isn’t meeting the required specifications. Ensure that the gear’s dimensions align with the original measurements, and check for any cracks or chips that could weaken its structure. If the gear material doesn’t match the specifications, it could cause unexpected failures down the line. As you continue your inspection, pay close attention to the gear teeth. Damaged teeth, such as chips, cracks, or uneven wear, can be early signs of issues. These flaws may result from improper lubrication or incompatible materials, so it’s important to identify and document them right away. Also, listen for unusual noises during manual rotation, which can indicate misalignment or internal damage. Feel for any roughness or resistance when turning the gear—it might be a sign of debris or insufficient lubrication affecting smooth operation. In addition, examine mounting points and fasteners. Loose or worn fasteners can lead to misalignment and uneven wear, jeopardizing the gear’s performance. Tighten any loose bolts and replace damaged ones before proceeding. Also, check for signs of corrosion or rust, especially around contact surfaces, as these can weaken the gear’s integrity.

Golf Simulator Projector Cover - Floor Mounted Enclosure with Cooling Fan for Optimal Protection of Outdoor Golf Simulation Projectors - Compatible with Leading Golf Simulators and Projectors
✅【Economical Solution】The Golf Simulator Projector Cover offers a budget-friendly alternative to ceiling installations, allowing you to easily position...
As an affiliate, we earn on qualifying purchases.
Frequently Asked Questions
How Often Should Refurb Gear Inspections Be Conducted?
You should conduct refurb gear inspections regularly, ideally every three to six months, depending on usage and operational conditions. During these inspections, guarantee lubrication standards are maintained and check gear alignment to prevent undue wear. Frequent inspections help catch issues early, prolong gear life, and maintain peak performance. Adjust the schedule based on the gear’s workload, environment, and manufacturer recommendations to keep everything running smoothly.
What Safety Precautions Are Necessary During Inspection?
During inspection, you should wear protective gear like gloves and safety glasses to prevent injury. Always review emergency procedures beforehand, so you’re prepared for accidents. Confirm the area is clear of hazards and follow proper handling protocols. Keep communication open with your team, and have emergency equipment nearby. Staying vigilant and adhering to safety precautions helps you inspect refurb gear safely, minimizing risks and ensuring a smooth, secure process.
Are There Specific Tools Required for Inspection?
You’ll want to gather the right inspection tools, like calipers, gauges, and torque wrenches, to make your assessment precise. These tools are your trusted compass and map through the inspection process. Make sure they’re calibrated properly—calibration procedures keep your instruments honest and accurate. Using the right tools with proper calibration helps you spot issues early, preventing future mishaps and ensuring each gear is ready to perform safely and reliably.
How to Document Inspection Findings Effectively?
To document inspection findings effectively, you should create clear, detailed inspection reports using documentation software. Record all observations, including any damages or irregularities, with precise descriptions and photos if possible. Use consistent terminology and organize the data logically. This approach guarantees easy review and tracking over time. Accurate documentation helps identify recurring issues, supports maintenance decisions, and maintains an all-encompassing record of gear condition for future reference.
What Are Common Signs of Gear Failure?
You’ll notice gear failure signs if gear noise suddenly spikes or worsens, making you question your sanity. Lubrication issues often cause grinding sounds or overheating, hinting that the gear isn’t feeling well. Cracks, corrosion, or excessive wear are dead giveaways. If your gear’s crying out or acting oddly, don’t ignore it. Address these signs promptly; otherwise, you risk catastrophic failure and a very costly, very loud surprise.

Projector Dust Cover for Ceiling Video Projector at Home or Outdoor Installation, Waterproof Dustproof Protection Case, 14"x14"x 9"
Ultimate Protection: waterproof cover protects your video projector from dust, scratches, and water damage or other possible factors...
As an affiliate, we earn on qualifying purchases.
Conclusion
In those first ten minutes, you hold the power to catch issues before they become disasters. By following this checklist, you guarantee your gear’s safety and longevity—think of it as your modern-day armor, like the knights of old. Don’t let complacency be your Achilles’ heel; stay vigilant and proactive. Remember, even in this fast-paced world, a thorough quick check can save you from a future of regret. Stay sharp and keep your gear in top shape.

Projector Dust Cover,Projector Cover Outdoor Case Protective,Dust-Proof,UV-Resistant,Moisture-Proof,Fit for Ceiling Video Mounted Equipment Enclosure Oxford,Cloth Drawstring(13.7" X 13.7" X 8.6")
【Projector Dust Cover Material and Design】: Mainly made of waterproof elastic Oxford cloth, with a sturdy and durable...
As an affiliate, we earn on qualifying purchases.

Projector Dust Cover,Fit for Ceiling Mounted Projector and Universa Projector Waterproof,Dust-Proof, UV-Resistant Cover Oxford Cloth,Dimensions13.7" x 13.7" X 8.6"
Projector dust cover: Protect the projector surface from damage. Keep the projector clean and prevent it from being...
As an affiliate, we earn on qualifying purchases.