To improve sports commentary clarity, focus on adjusting your center channel EQ to boost mid-range frequencies around 300 Hz to 3,400 Hz, where speech sounds are most distinct. Position your microphone about 6 to 12 inches from the commentator’s mouth to capture their voice clearly and minimize background noise. Keep the EQ settings simple by reducing overly bassy or shrill sounds, and learn how slight tweaks can make a big difference—there’s more to master here if you keep exploring.
Key Takeaways
- Focus on boosting the mid-range frequencies (300 Hz to 3,400 Hz) in the center channel EQ to enhance speech clarity.
- Reduce unnecessary low frequencies and shrill high frequencies to prevent muddiness and harshness in commentary.
- Use simple EQ presets or sliders to adjust sound without complex settings, making it accessible for beginners.
- Position the microphone close to the commentator’s mouth (6-12 inches) to improve voice pickup and reduce background noise.
- Regularly tweak EQ and microphone placement to maintain optimal clarity during broadcasts.
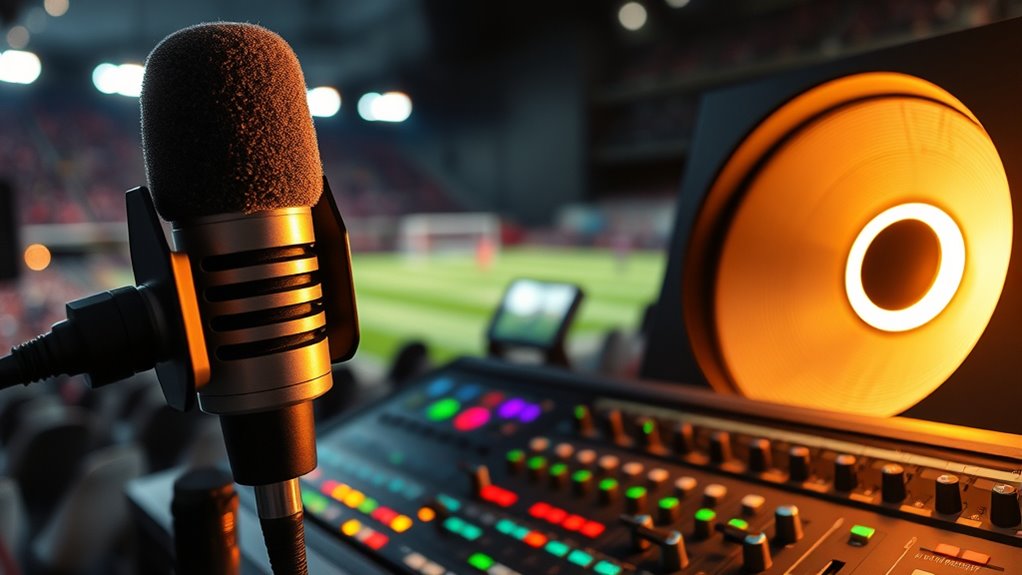
Clear sports commentary is essential for enhancing your viewing experience, yet it can often be hindered by technical issues or overly complex language. One of the most common problems is poor audio quality, which can make it difficult to catch every play, comment, or exciting moment. Fortunately, understanding some basics about audio frequency and microphone placement can considerably improve the clarity of commentary. These elements are straightforward to adjust and can make a noticeable difference in how well you hear the announcers.
Audio frequency plays a vital role in capturing clear sound. Human speech generally falls within the 300 Hz to 3,400 Hz range, which means that focusing on this frequency band helps isolate voices from background noise. If the audio is too bass-heavy or too shrill, it becomes harder to understand what’s being said. Using a simple equalizer (EQ) to boost mid-range frequencies and reduce unnecessary low or high frequencies can sharpen the voice clarity, making commentary much more intelligible. This process, known as center channel EQ, allows you to tailor the audio to suit your environment, ensuring voices come through crisp and clear.
Focusing on 300 Hz to 3,400 Hz enhances speech clarity and reduces background noise.
Another key factor is microphone placement. Where you position the microphone directly impacts how well it captures the commentator’s voice. Ideally, the microphone should be placed close enough to pick up clear sound without capturing too much ambient noise. For sports broadcasts, the microphone is often positioned near the announcer’s mouth, but if you’re doing your own commentary or listening to a home broadcast, adjusting the microphone to be at an ideal distance—about six to twelve inches away—can greatly improve clarity. Proper placement minimizes echo and background noise, ensuring the commentator’s voice remains prominent and easy to follow.
Adjusting microphone placement also helps manage audio frequency issues. For example, if the microphone picks up too much low-frequency rumble or handling noise, moving it slightly away or changing its angle can reduce these unwanted sounds. Conversely, bringing the microphone closer can boost the audio frequency range of the announcer’s voice, making it stand out more against the ambient sounds of the game.
Top picks for "sport commentary clarity"
Open Amazon search results for this keyword.
As an affiliate, we earn on qualifying purchases.
Frequently Asked Questions
How Do I Identify Problematic Frequencies in Sports Commentary?
To identify problematic frequencies in sports commentary, listen closely for audio masking issues where speech gets buried behind background sounds. Use an equalizer to sweep through the frequency spectrum, paying attention to areas where clarity drops. If certain frequencies cause masking or muddiness, reduce them. Focus on midrange frequencies, typically around 1-4 kHz, to improve speech intelligibility and prevent frequency masking, making commentary clearer and more distinct.
What EQuipment Is Needed for Effective Center Channel EQ Adjustment?
Imagine opening the true potential of your sound—so, for effective center channel EQ adjustment, you’ll need a good-quality microphone and well-placed speakers. A sound mixer or equalizer with adjustable controls helps fine-tune frequencies. Make sure your microphone quality is high, and speakers are correctly positioned to capture and project clarity. With this gear, you’ll effortlessly bring out crispness and focus, making every word resonate with power and precision.
Can EQ Settings Be Different for Various Sports Broadcasts?
Yes, EQ settings can differ for various sports broadcasts because audio calibration and listener preferences vary. You might adjust the center channel to emphasize commentary or crowd noise depending on the sport and your setup. Experimenting with EQ allows you to tailor the sound to your liking, ensuring clear commentary and immersive experience. Keep in mind, flexibility helps you optimize audio for each broadcast, enhancing overall clarity and enjoyment.
How Often Should I Retune My Center Channel EQ During a Broadcast?
You should retune your center channel EQ during a broadcast only if you notice audio imbalances or changes in content that affect clarity. Regular audio calibration helps maintain ideal sound, but listener preferences vary, so trust your ears. Make small adjustments as needed, especially when switching between sports or commentary styles. Periodic retuning ensures the audio remains clear and balanced, enhancing the overall broadcast experience for your audience.
Are There Any Common Mistakes to Avoid When Adjusting EQ for Commentary Clarity?
When adjusting EQ for commentary clarity, avoid common mistakes like neglecting audio calibration and ignoring listener preferences. Don’t over-boost midrange frequencies, as it can cause harshness, or under-adjust if speech sounds dull. Always check calibration levels first, ensuring your audio setup is accurate. Regularly listen to feedback from your audience or team members, and fine-tune your EQ based on their preferences to maintain crystal-clear commentary.
Conclusion
So, next time you’re struggling to hear that vital play, remember—it’s surprisingly simple to clear up the chaos with just a few EQ tweaks. Who knew that a little center channel adjustment could turn your muddled commentary into crystal-clear analysis? Ironically, amidst all the high-tech gear, sometimes the simplest fix is the most effective. Now, you’re ready to elevate your broadcast and impress even the most discerning sports fans—without breaking a sweat.